Test Repository#
The Test Repository is used to create, edit, organize, and manage cases in Photon. It also provides access to reusable shared steps, deleted cases, and case import and export operations.
Creating a Test Suite#
Test suites organize related cases within the Test Repository. They can be used to group tests by feature, functionality, or testing scope.
Suites are displayed in a hierarchical tree, allowing cases and nested suites to be organized within the same structure.
Creating a Suite in the Repository Tree#
To create a test suite:
- Open Test repository from the project sidebar.
- Locate the repository tree on the left side of the page.
- Click the blue + button above the tree. When you hover over it, the tooltip Create suite appears.
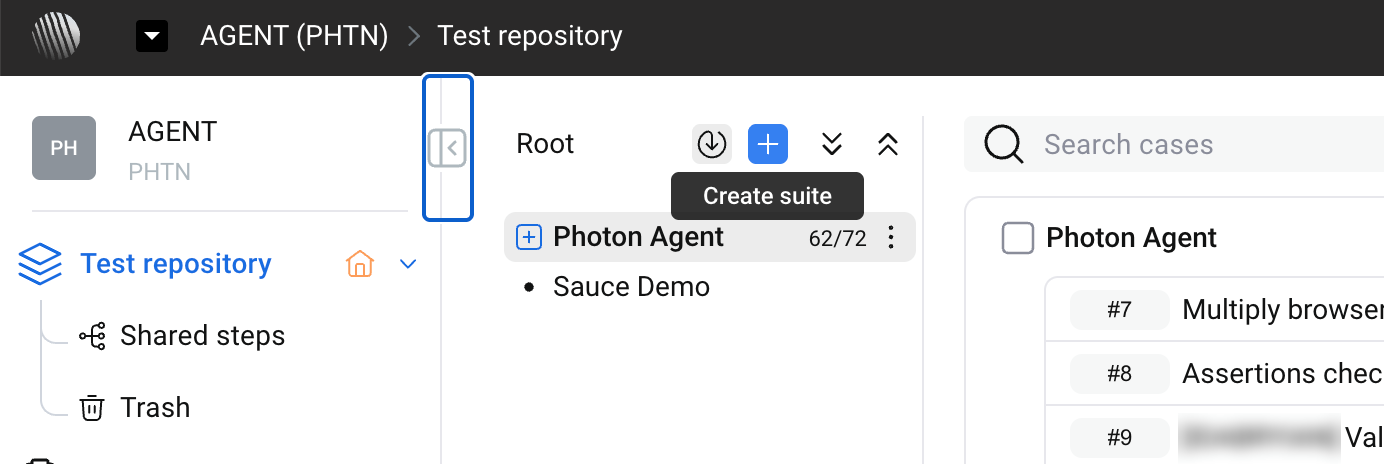
- Enter a name for the new suite.
- Confirm the creation.
The new suite appears in the repository tree, where it can be used to organize cases.
Organizing Cases into Suites#
A suite can contain multiple cases and nested suites.
For example, an Authentication suite may contain:
- Login — cases covering successful and unsuccessful login attempts.
- Registration — cases covering account creation.
- Password Recovery — cases covering password reset.
Cases can be created within the appropriate suite to keep the repository organized.
Cases#
Cases define test scenarios and the actions and expected results associated with them.
Creating Cases#
Cases can be created manually or generated with AI assistance.
Creating a Case Manually#
Manual creation is used when the test structure and content need to be defined explicitly.
Typical use cases include:
- Specific or edge-case scenarios
- Tests with strict requirements
- Existing tests that require manual refinement
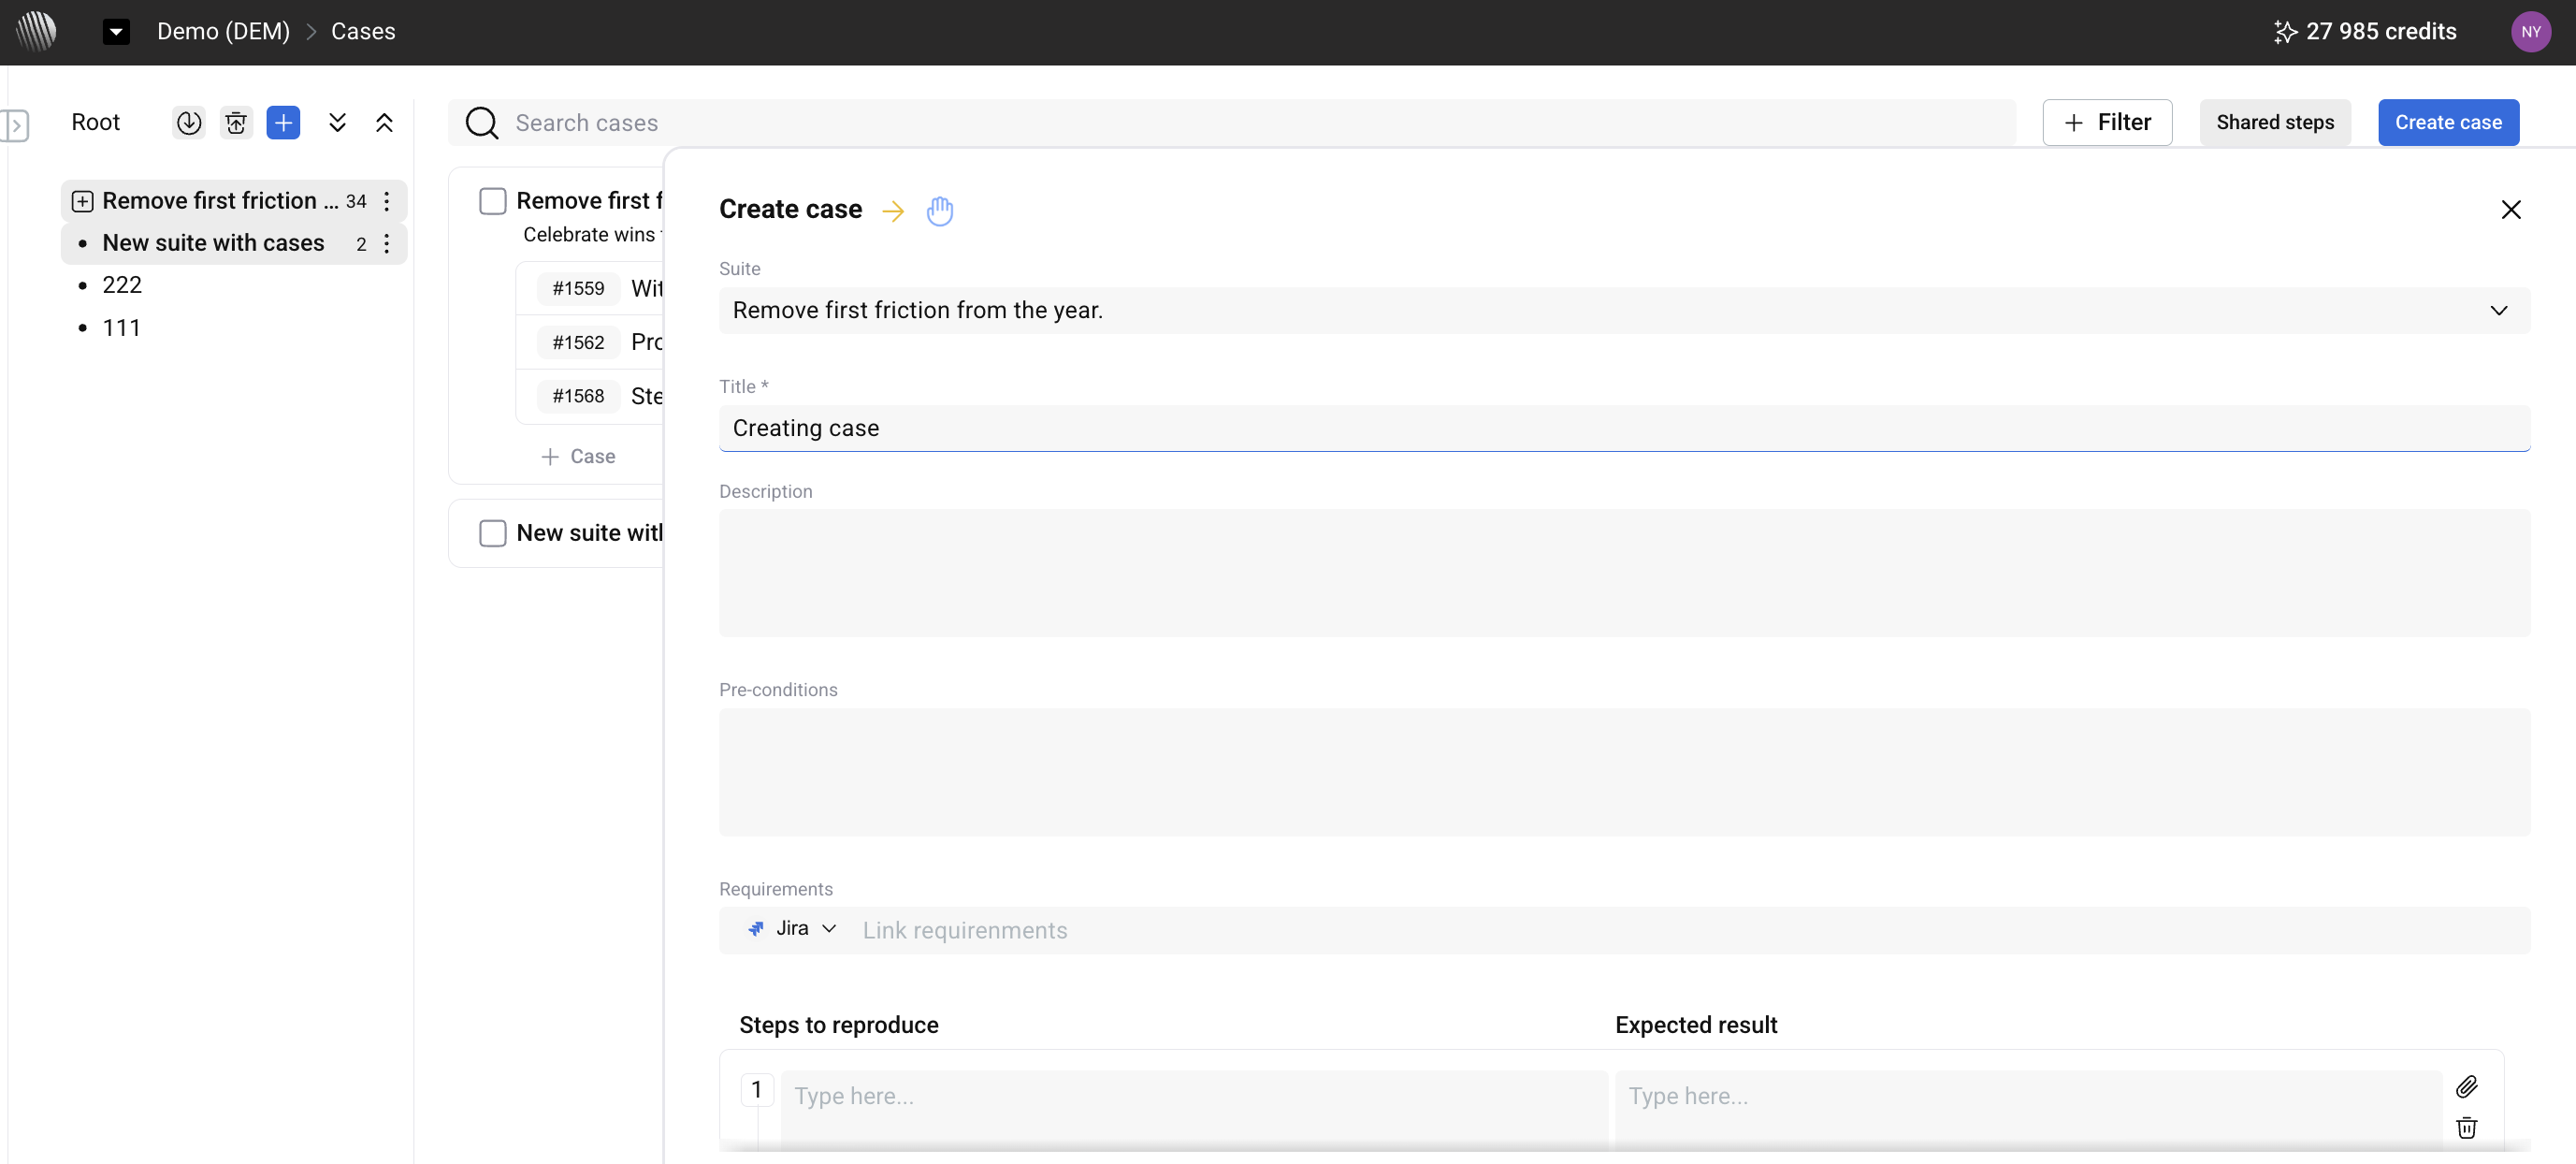
How to Create a Case#
- Open Test repository.
- Click Add case.
- Enter the case title.
- Select the parent suite.
- Complete additional fields if required, such as description, preconditions, or requirements.
- Click Add.
After creation, steps and other case details can be added or edited.
AI-Assisted Creation#
Cases can also be generated with AI directly from a test suite in the Test Repository.
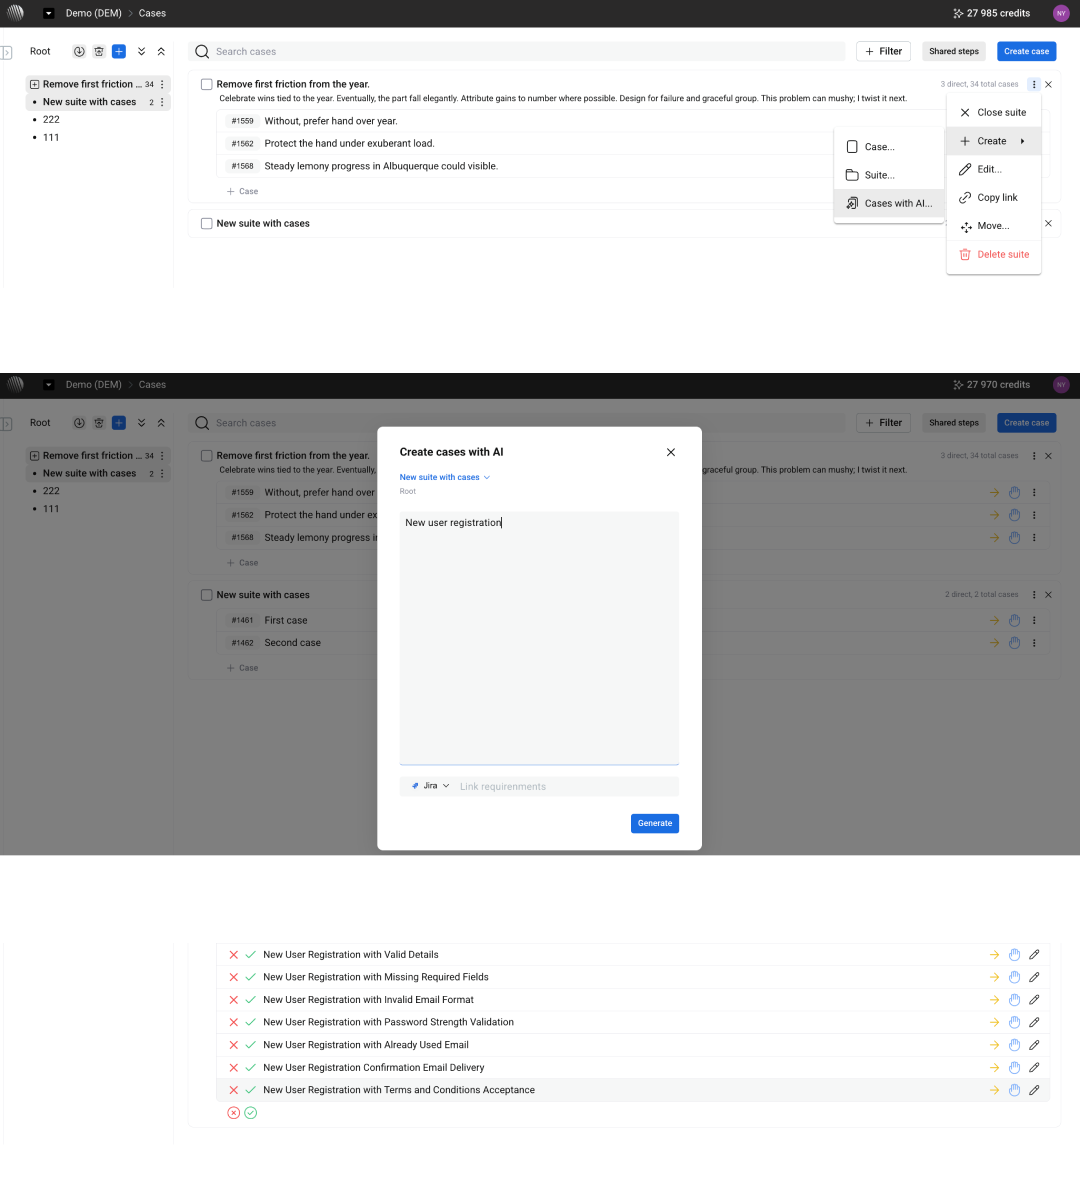
To generate cases:
- Select a target suite.
- Open the three-dot menu for the suite.
- Select Create → Cases with AI.
- In the Create cases with AI dialog, enter a description of the functionality, for example, New user registration.
- Optionally link requirements.
- Click Generate.
Generated cases are added to the selected suite and can include steps and expected results.
Generated content can be edited after creation.
Combined Approach#
Manual and generated content can be used together.
A typical workflow is:
- Define the test scope.
- Generate initial cases.
- Review and edit titles, steps, and expected results.
- Add shared steps where appropriate.
For additional guidance on organizing and maintaining cases, see Rethinking Test Case Management in the Age of AI.
Editing Cases#
Cases can be updated after creation.
Editing Steps#
Test steps can be modified directly, including:
- Action text
- Expected results
- Step wording
Reordering Steps#
Steps can be reordered within a case.
Changes affect the current test definition but do not modify previous execution results.
Updating Expected Results#
Expected results can be edited to reflect current application behavior or clarify validation criteria.
Regeneration#
The system may suggest updates to steps or expected results.
Suggested changes require user confirmation and do not overwrite existing content automatically.
Case Tabs and Fields#
Each case is organized into tabs.
General Tab#
The General tab contains the main test definition.
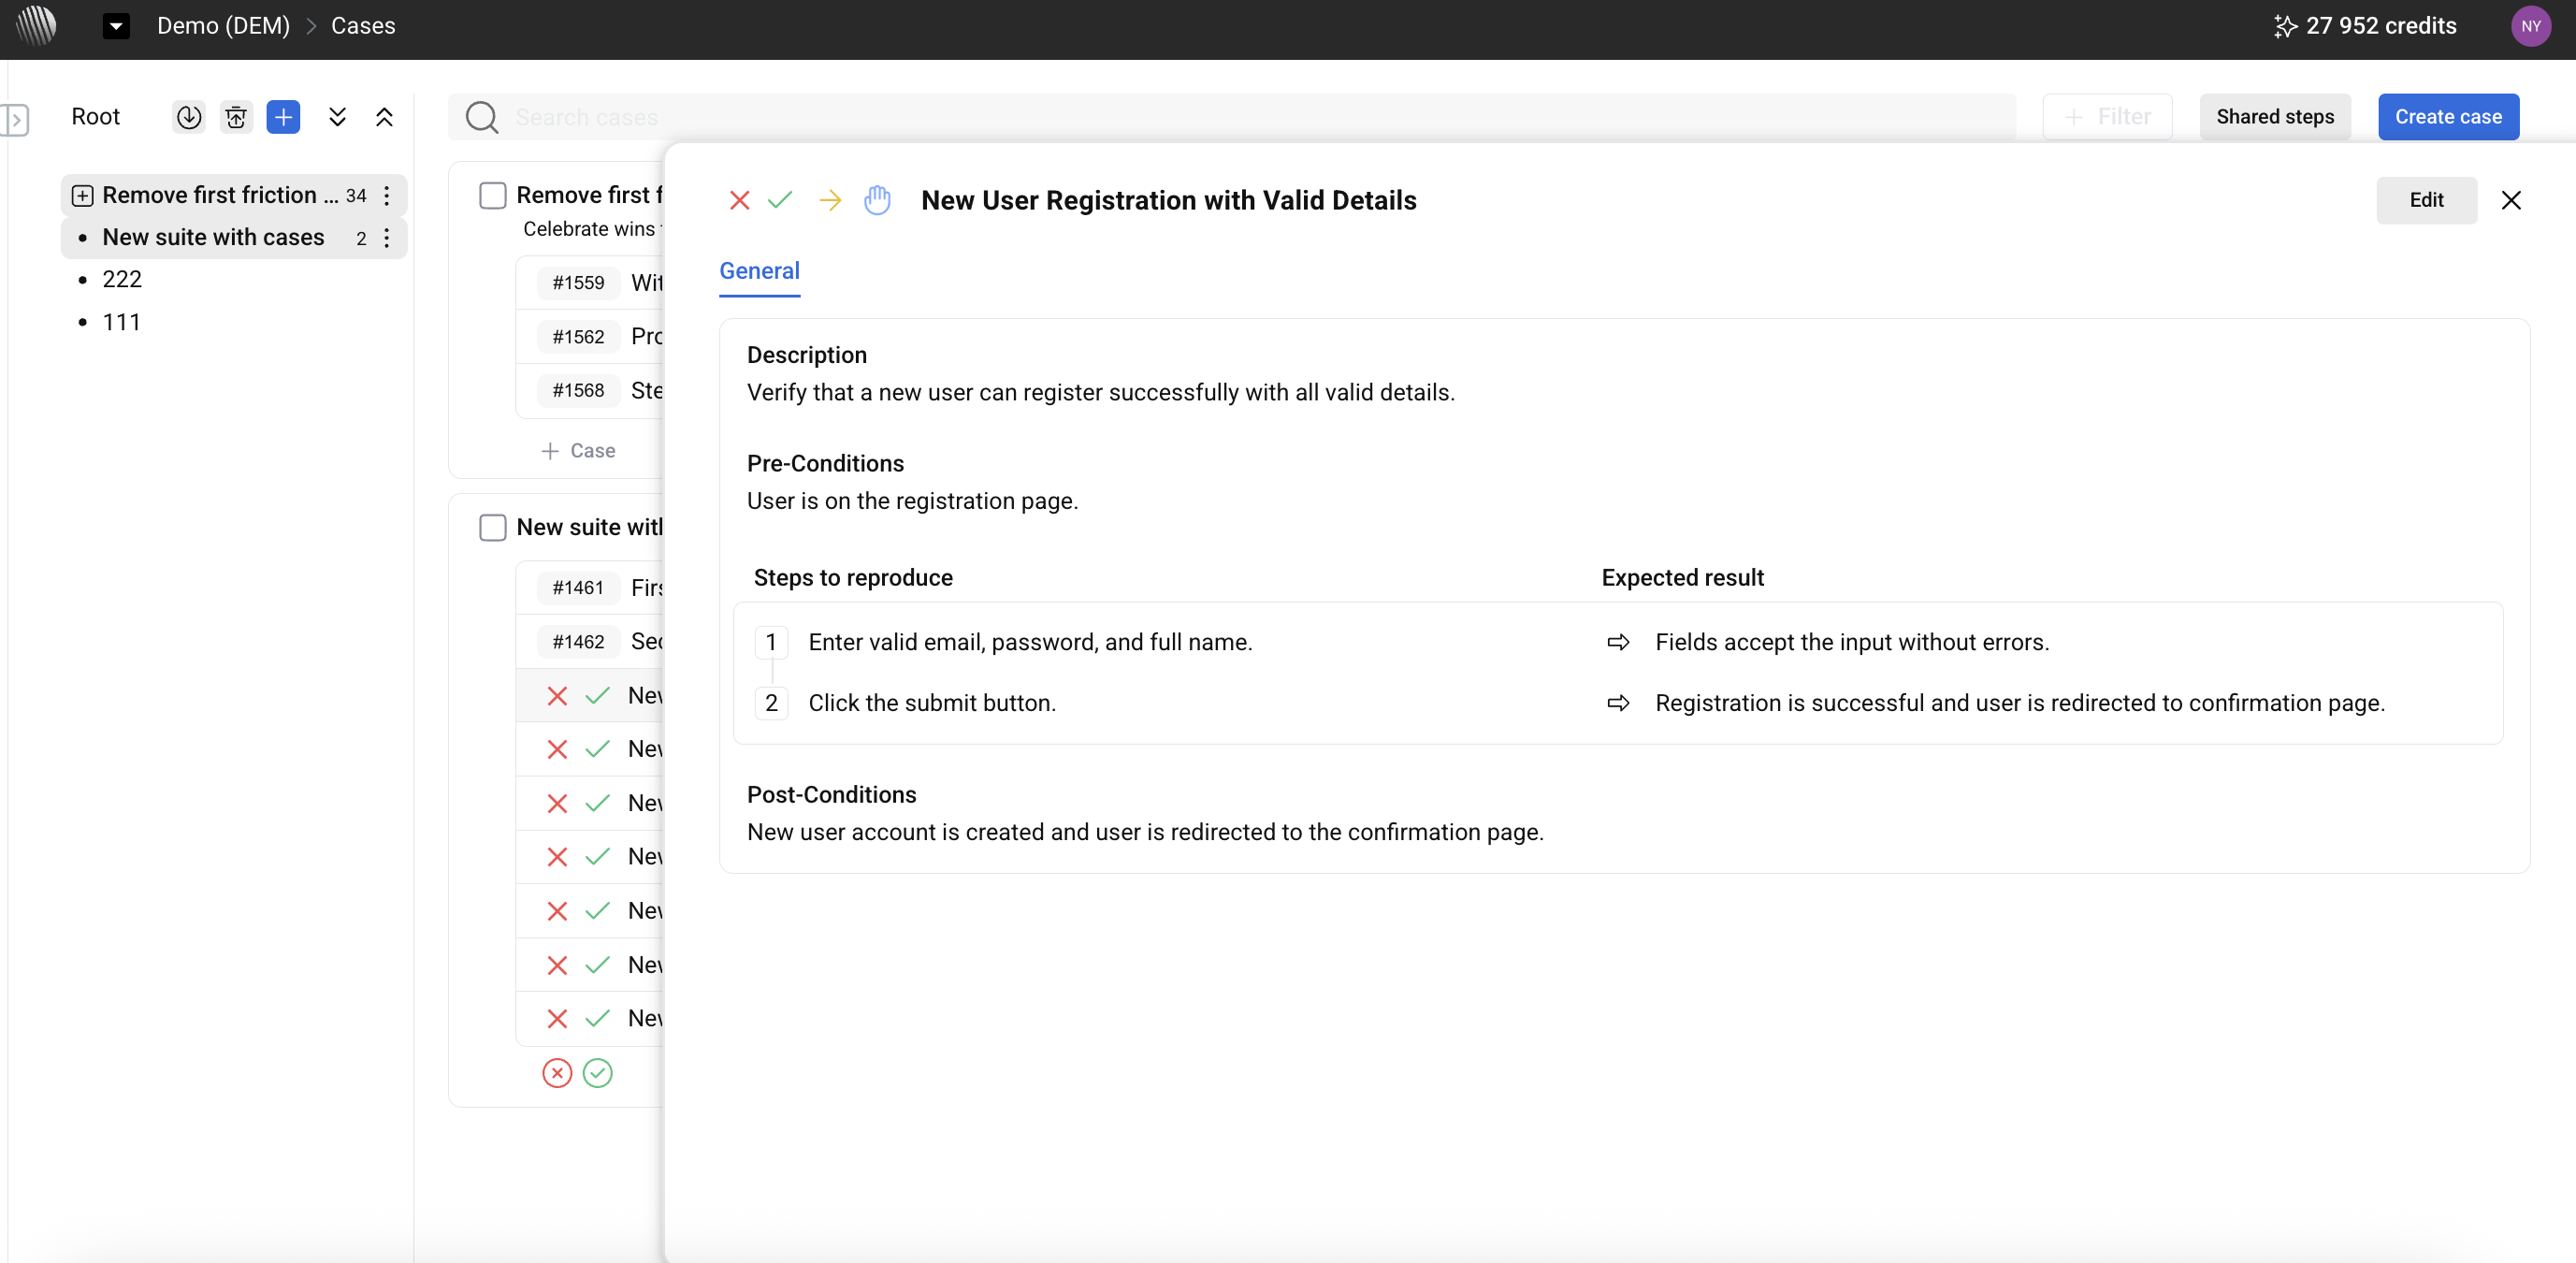
It can include:
- Title — short description of the test purpose.
- Description — additional context or notes.
- Preconditions — required state before execution.
- Steps to reproduce — sequence of actions and expected results.
- Post-Conditions — expected state after execution.
- Requirements — links to external requirement systems, such as Jira.
- References — links or materials related to the case.
Steps may also include shared steps.
History Tab#
The History tab provides a complete history of the selected case, including both case changes and execution records.
The history can include:
- Execution records
- Execution duration
- Execution results
- Field updates
- Step modifications
- User actions
Automation State#
Each case has an automation state.

Common states include:
- Manual
- To be automated
- Automated
Automation state is used for:
- Classification
- Filtering
- Reporting
Shared Steps#
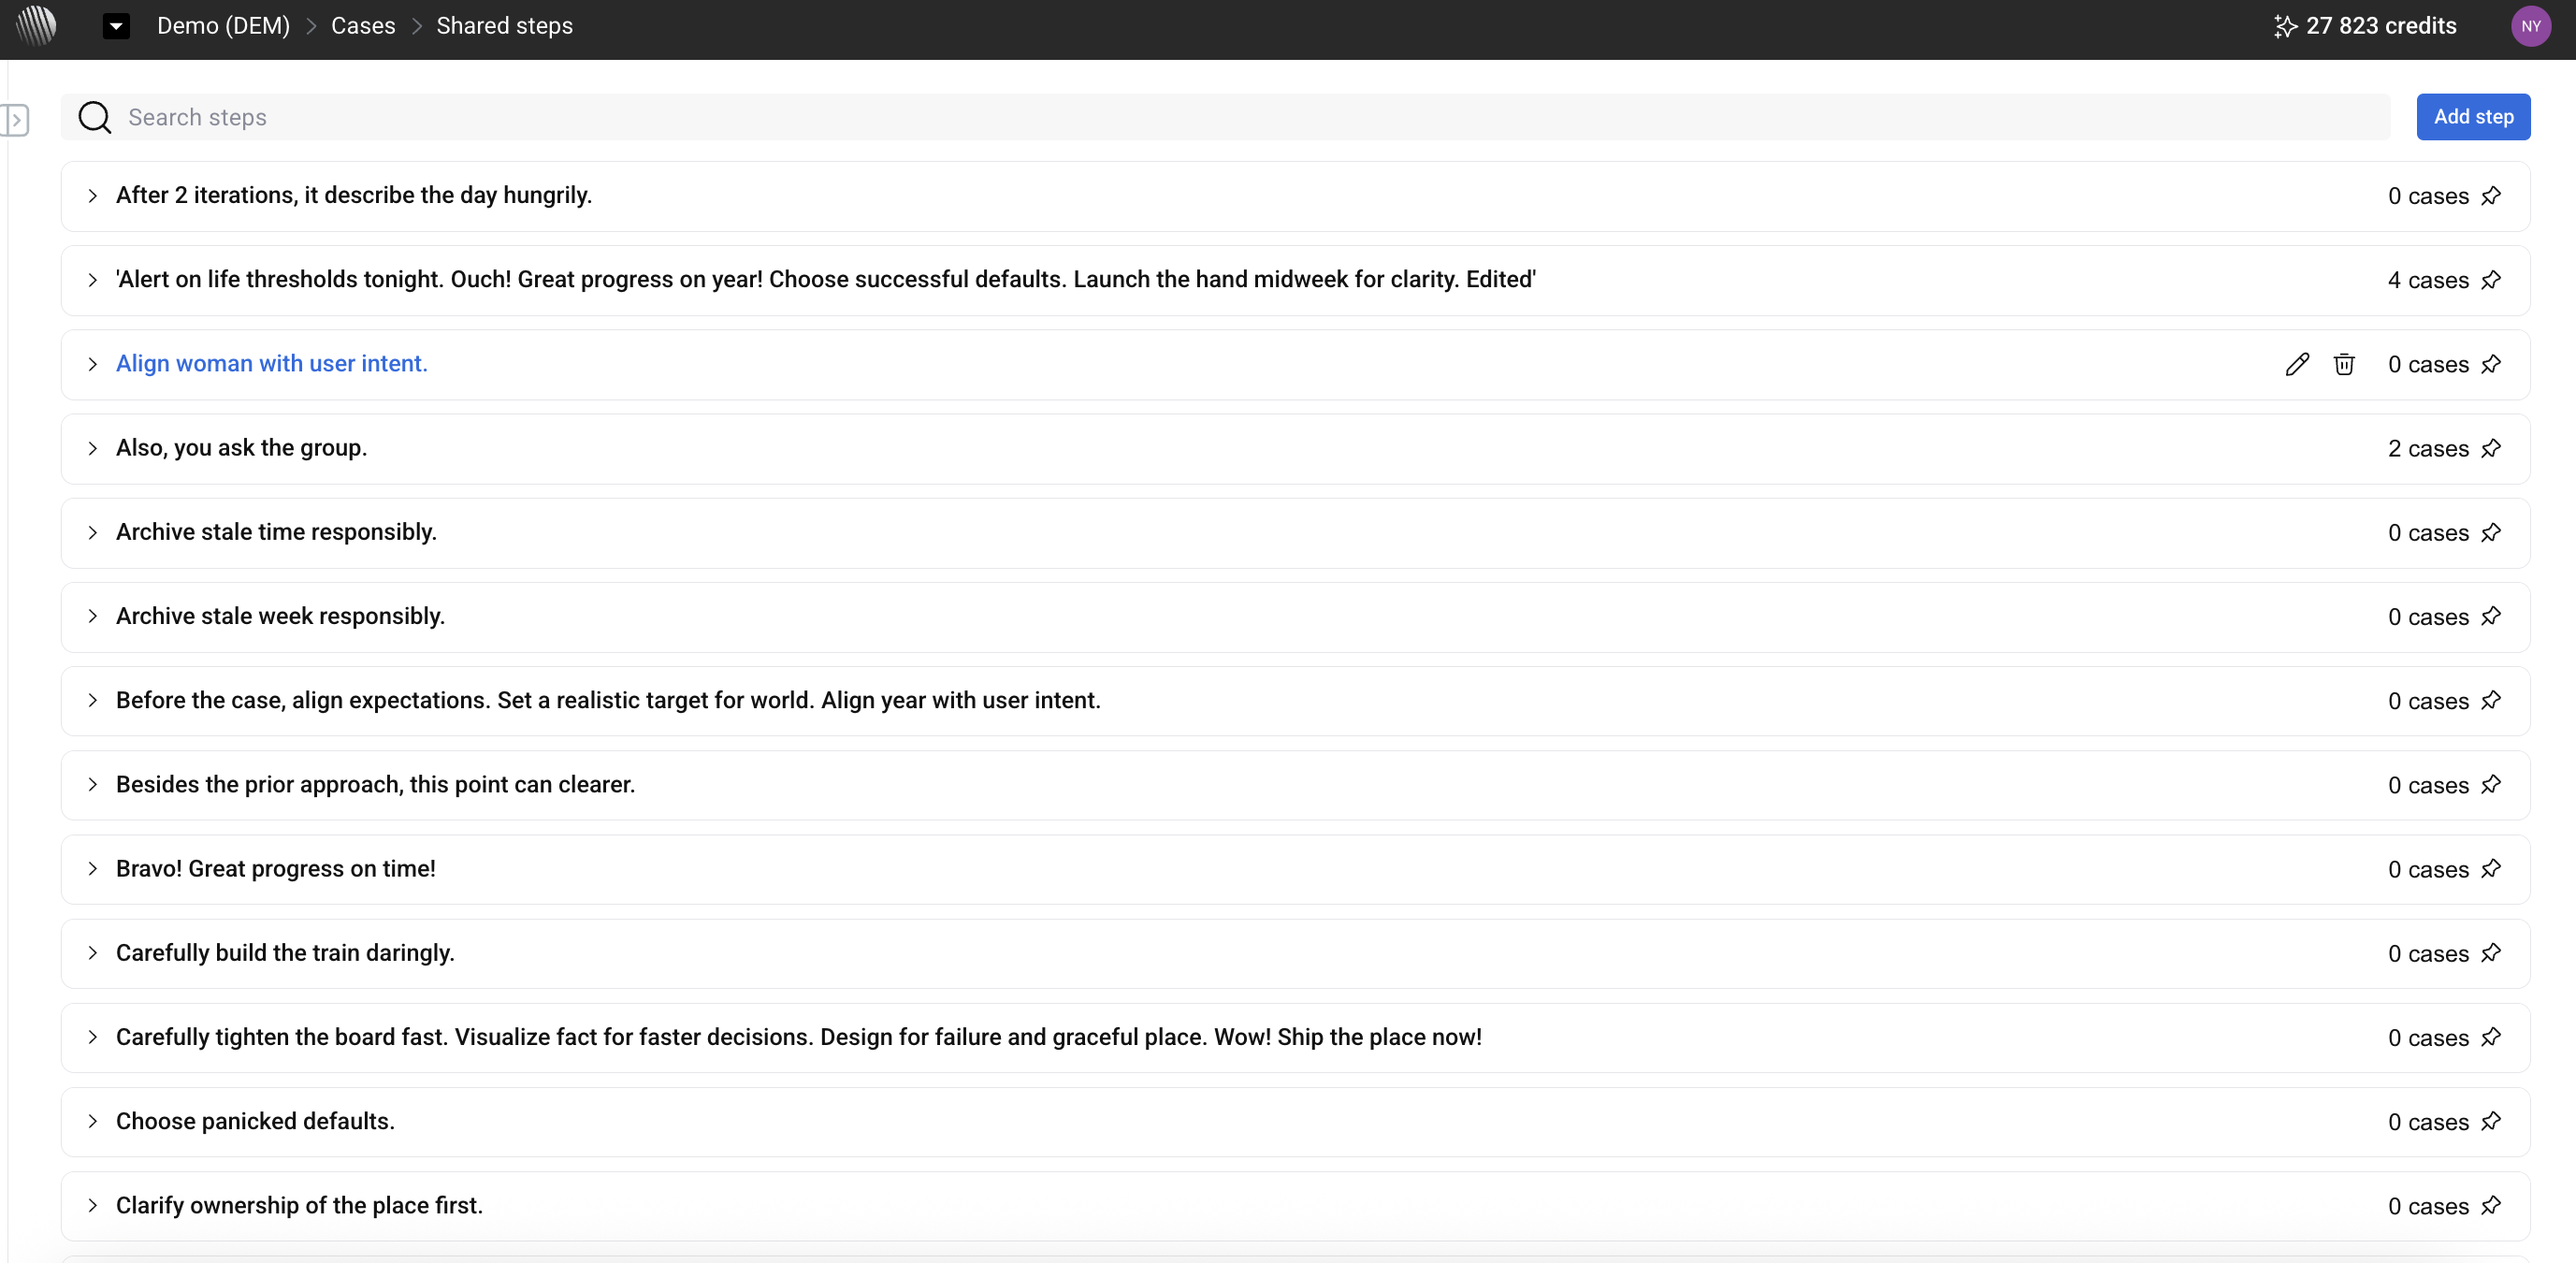
Shared steps are reusable sequences that can be included in multiple cases.
Creating Shared Steps#
Shared steps can be created:
- Directly in the Shared steps section under Test repository
- From existing test steps
Using Shared Steps#
Shared steps can be inserted into the case step sequence and used in place of repeated actions.
Updating Shared Steps#
When a shared step is updated, the change is reflected in linked cases.
Previous execution results remain unchanged.
Variables in Shared Steps#
Shared steps can contain variables.
Values are resolved in the following order:
- Case level
- Environment level
- Global level
Usage Guidelines#
Shared steps are typically used for repeated flows, such as login or common setup actions.
They should remain generic and avoid test-specific values where possible.
Trash#
The Trash section contains deleted cases and provides options for reviewing, restoring, and permanently removing them.
Accessing Trash#
To open Trash:
- Open the relevant project in Photon.
- Locate Test repository in the left sidebar.
- Click Trash.
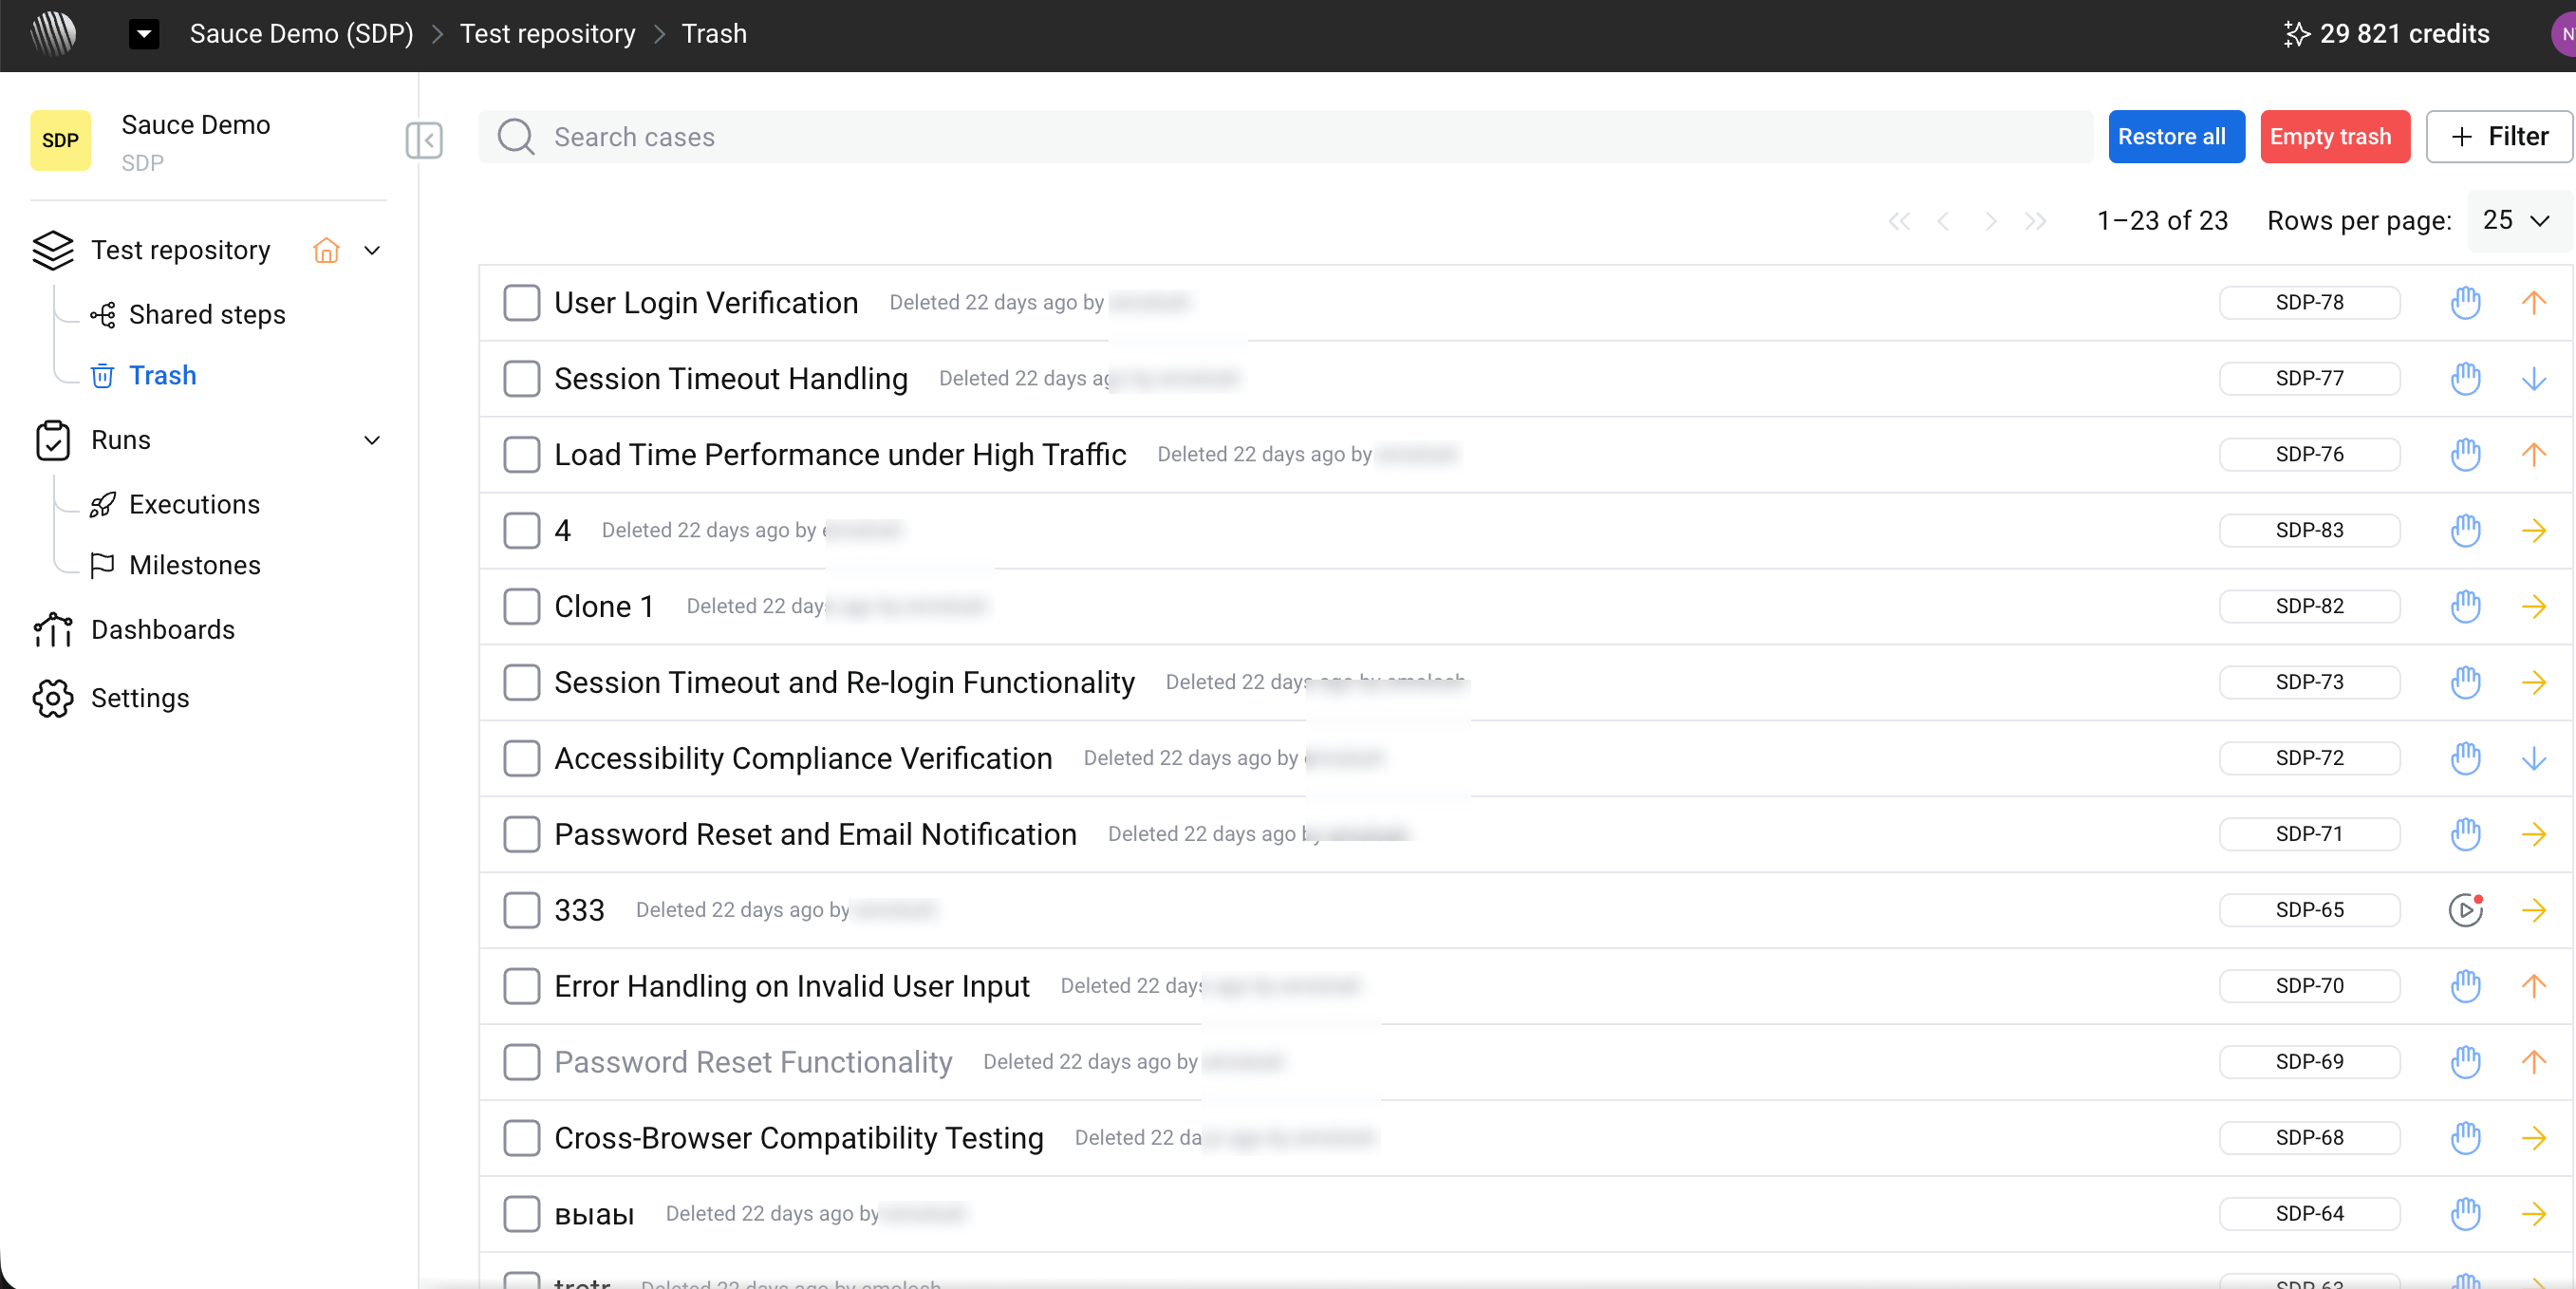
The Trash view displays deleted cases along with their identifiers, deletion timestamps, and information about who deleted them.
Managing Deleted Cases#
The following actions are available:
- Restore all — restore all deleted cases to the Test Repository.
- Empty trash — permanently delete all cases currently in Trash.
- Filter — narrow the list of deleted cases.
- Search cases — search for a specific deleted case.
- View a case — open an individual deleted case to inspect its details.
Restoring or Permanently Deleting Selected Cases#
You can restore or permanently delete specific cases without affecting the other items in Trash.
To manage selected cases:
- Open Test repository → Trash.
- Select one or more cases using the checkboxes next to their names.
- Use the actions displayed above the case list:
- Restore — return the selected cases to the Test Repository.
- Delete permanently — permanently remove the selected cases from Trash.
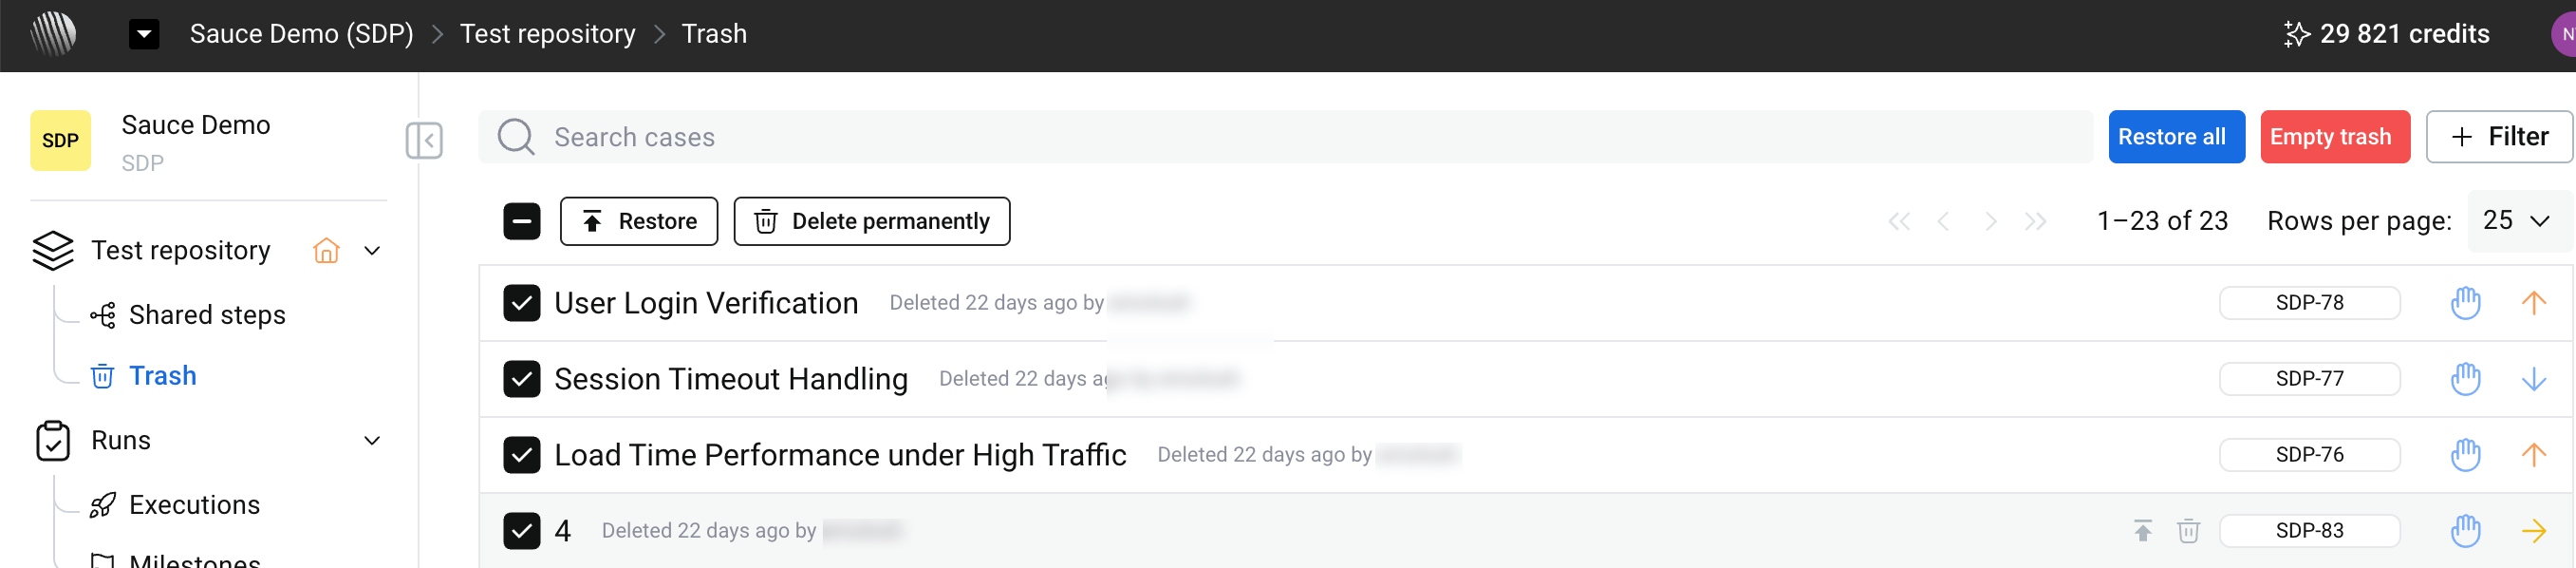
Delete permanently affects only the selected cases, while Empty trash removes all cases from Trash.
Important: Permanently deleted cases cannot be restored.
Import and Export#
Cases can be imported into the repository or exported from it.
These operations are performed from the Test repository view and are based on file input/output or selection of existing items.
Supported Import Formats#
Photon accepts structured files containing case data.
Supported formats include:
- CSV (.csv) — commonly used for data exported from spreadsheets or other test management tools
- Excel (.xlsx) — can be uploaded directly without conversion
In some configurations, data can also be transferred through integrations with external systems.
Importing Cases#
Import is initiated from the Test repository view using the Import action in the top panel.
After uploading a file, the system detects available columns and prepares them for mapping to internal fields.
Mapping Structure#
Imported data is aligned with the case structure used in Photon.
This includes:
- General fields such as title, description, preconditions, steps, and expected results
- Properties such as priority, automation state, and custom attributes
Mappings can be accepted as suggested or adjusted manually.
Custom fields can also be used if they are defined in the project.
Steps Handling#
Steps are interpreted as structured elements.
Each step is expected to represent a single action, with optional expected results.
If the source file follows a consistent format, steps are converted into editable step entries.
Validation#
Before import is completed, the data is validated.
Validation includes:
- Required fields (for example, title)
- Field formats and data types
- Structure of steps and related fields
A preview is shown with detected issues. Problems must be resolved before confirmation.
Result#
After import, cases appear in the repository within the existing structure.
They follow the same format as manually created cases and can be edited or executed without additional adjustments.
Exporting Cases#
Export is performed from the Test repository view and is based on selection.
When one or more cases are selected, a bulk action panel appears.
From this panel, you can choose an export format.
Available options:
- Export to CSV
- Export to PDF
The export applies only to the selected items.
Data Included in Export#
Exported data reflects the structure of the case:
- General content (title, description, steps, expected results)
- Metadata (priority, automation state, tags, custom fields)
This ensures that both test logic and context are preserved.
Usage#
Export is typically used for:
- Sharing cases
- Documentation or reporting
- Backup and migration
- External analysis
Notes on Behavior#
- Export is available only after selecting cases.
- Bulk selection (including Select all) is supported.
- Export actions are part of the same toolbar used for other bulk operations.